Adding Thumbnail Previews to Folders in Mac Finder with Python
Simple Script to Generate and Save Folder Icons
Part of the Python Tutorials series

I prefer MacOS over Windows for the most part. But the one thing I miss from the file manager in Windows is the thumbnail previews on image folders. You’d think Apple would have added this by now. Sure, you can use the Mac photos app, or a 3rd party app to manage images, but when you’re in Finder and looking for an image, or where you want to save one and you’re looking for the right folder, it really helps to see a preview without having to open each folder.
What we need is a simple script that scans a folder for images, grabs the first 4 files and creates a 2 x 2 grid, then save it as a folder icon for that folder. This way we can run the script as a folder action or from the terminal, and choose which folders to run it on. Let’s build it with Python!
This guide will cover:
- Saving an image as a folder icon with fileicon CLI
- Scanning a folder to get a list of images
- Building a 2x2 grid of images with PIL (Pillow)
- Saving the image as a folder icon using Python
- Adding the script to your PATH so it works in any directory
- Adding the script to Finder’s Quick Action menu using Apple Scripts
Ready to dive in?
Saving an image as a folder icon with fileicon CLI
Before we get into Python scripts, and searching for images to build a thumbnail grid, let’s first look at how to set any image as a folder’s icon in Mac. There’s a simple CLI tool called fileicon that makes this easy to do with one command.
Install fileicon (Install brew first if needed)
brew install fileiconThen open the terminal and navigate to a folder that has an image file. From here you can use fileicon to set the folder icon:
fileicon set . ./cover.png
# fileicon set /path/to/folder /path/to/image/image.png
Turn on hidden file viewing (cmd+shift+.) and you should see a new Icon? file created, as well as the actual folder icon showing now.

That’s it! If you just want a single image and don’t mind doing it from the terminal, this is really all you need. But if you want a grid of 4 images, or a right-click quick action on the folder context menu, keep reading.
Scanning a folder to get a list of images
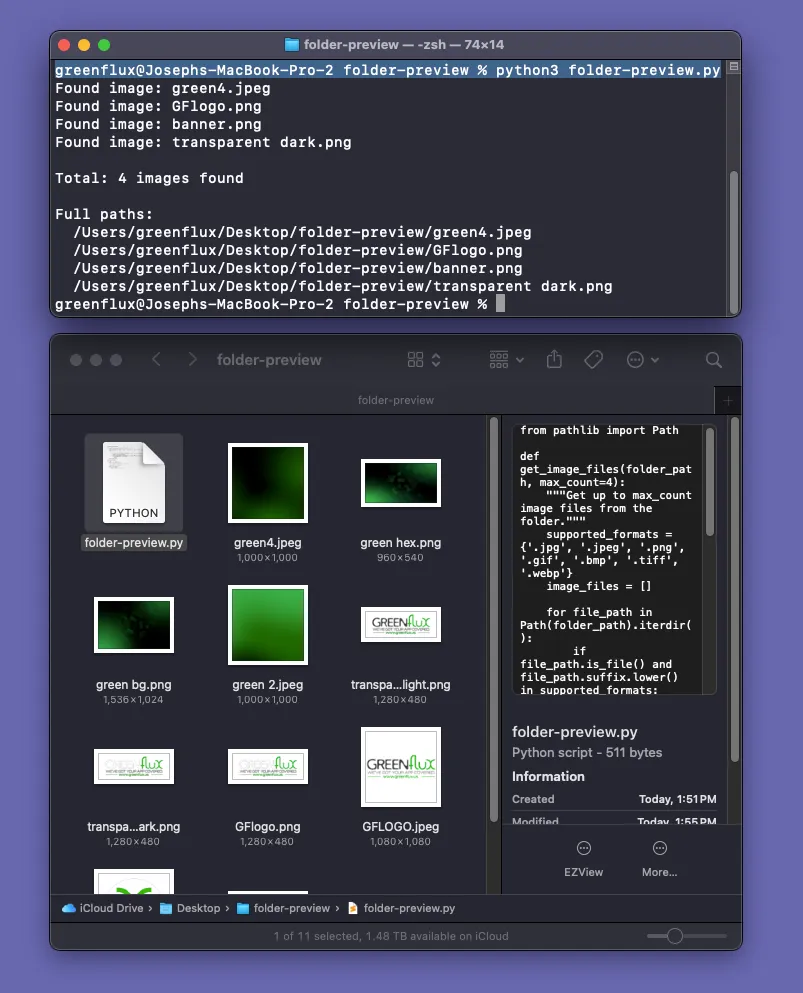
First let’s use Python’s pathlib module to return a list of image files in a folder.
Create a new folder for the project called folder-preview, then add a new Python script named folder-preview.py.
from pathlib import Path

def get_image_files(folder_path, max_count=4):
    """Get up to max_count image files from the folder."""
    supported_formats = {'.jpg', '.jpeg', '.png', '.gif', '.bmp', '.tiff', '.webp'}
    image_files = []

    for file_path in Path(folder_path).iterdir():
        if file_path.is_file() and file_path.suffix.lower() in supported_formats:
            image_files.append(file_path)
            print(f"Found image: {file_path}")  # Log each image as we find it
            if len(image_files) >= max_count:
                break

    return image_files

# Test the function
if __name__ == "__main__":
    images = get_image_files(".")
    print(f"\nTotal: {len(images)} images found")

    # Also print the full paths
    print("\nFull paths:")
    for img in images:
        print(f"  {img.absolute()}")
This will return an array with the first 4 images found. Save script, then set up a virtual environment:
python3 -m venv venv
source venv/bin/activate # On macOS/Linux
# or
# venv\Scripts\activate # On Windows
Next, install Pillow, for image processing:
pip install PillowNow make sure you have at least 4 images saved in the project folder, then run the script:
python3 folder_preview.pyYou should see a list of your image files, with the other files being ignored.
 Ok, next we’ll build a thumbnail grid with these images.
Building a 2x2 grid of images with PIL (Pillow)
Now for the fun part! We’ll use PIL to generate a new 2 x 2 grid of thumbnails for the new folder icon.
from pathlib import Path
from PIL import Image, ImageDraw
import sys
def create_thumbnail_grid(image_paths, folder_path, output_size=(512, 512), force=False):
"""Create a 2x2 grid from up to 4 images with proper aspect ratio handling."""
# Check if cover.png already exists
cover_path = Path(folder_path) / "cover.png"
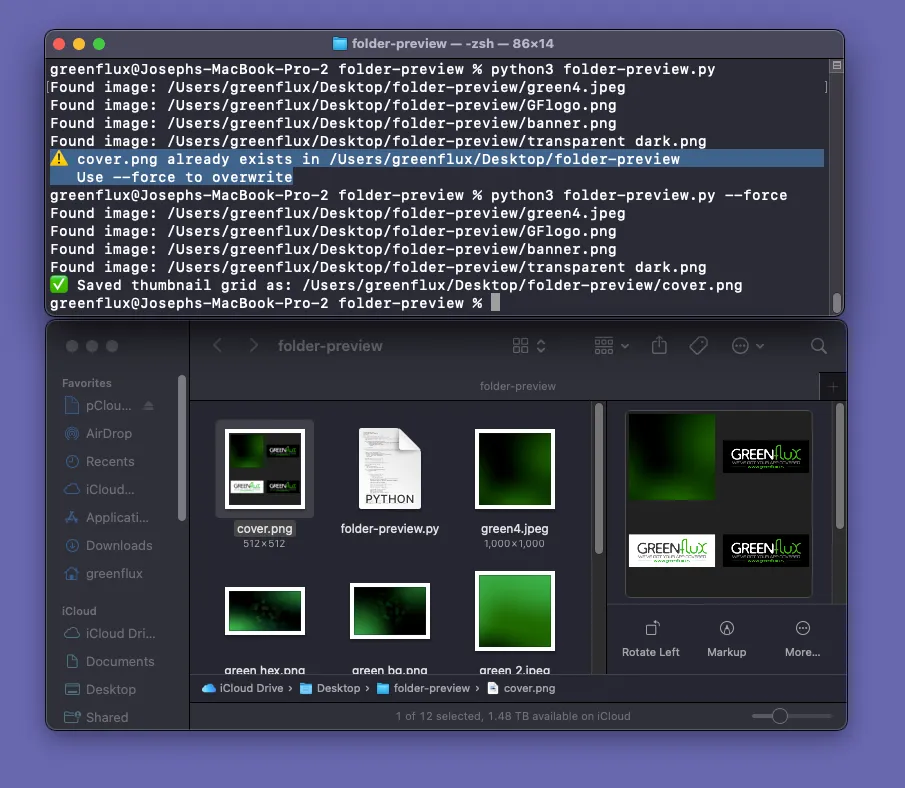
if cover_path.exists() and not force:
print(f"⚠️ cover.png already exists in {folder_path}")
print(" Use --force to overwrite")
sys.exit(0)
grid_size = 2
cell_size = output_size[0] // grid_size
padding = 10 # Space between images
# Create blank canvas with dark background
grid_image = Image.new('RGB', output_size, '#212121')
# Calculate positions for 2x2 grid
positions = [
(0, 0), (cell_size, 0),
(0, cell_size), (cell_size, cell_size)
]
for i, img_path in enumerate(image_paths[:4]):
if i >= len(positions):
break
try:
with Image.open(img_path) as img:
# Convert to RGB if needed
if img.mode != 'RGB':
img = img.convert('RGB')
# Calculate size to fit in cell while maintaining aspect ratio
max_size = cell_size - (padding * 2)
img.thumbnail((max_size, max_size), Image.Resampling.LANCZOS)
# Get actual size after thumbnail
thumb_width, thumb_height = img.size
# Calculate position to center image in its cell
cell_x, cell_y = positions[i]
x_offset = (cell_size - thumb_width) // 2
y_offset = (cell_size - thumb_height) // 2
# Paste image centered in its cell
paste_x = cell_x + x_offset
paste_y = cell_y + y_offset
grid_image.paste(img, (paste_x, paste_y))
except Exception as e:
print(f"Error processing {img_path}: {e}")
continue
# Add subtle grid lines
draw = ImageDraw.Draw(grid_image)
# Vertical line
draw.line([(cell_size, 0), (cell_size, output_size[1])], fill=(50, 50, 50), width=1)
# Horizontal line
draw.line([(0, cell_size), (output_size[0], cell_size)], fill=(50, 50, 50), width=1)
# Outer border
draw.rectangle([0, 0, output_size[0] - 1, output_size[1] - 1], outline=(50, 50, 50), width=2)
# Save the grid as cover.png
grid_image.save(cover_path, 'PNG')
print(f"✅ Saved thumbnail grid as: {cover_path}")
return grid_image
Then update the main function to handle the —force argument, to allow overwriting existing cover images.
import argparse

def main():
    parser = argparse.ArgumentParser(description="Generate folder preview icons")
    parser.add_argument("directory", nargs="?", default=".",
                       help="Directory to process")
    parser.add_argument("--force", action="store_true",
                       help="Overwrite existing cover.png")
    args = parser.parse_args()

    folder = Path(args.directory).resolve()

    # Get images
    images = get_image_files(folder)
    if not images:
        print("No images found!")
        return

    # Create grid and save as cover.png
    grid = create_thumbnail_grid(images, folder, force=args.force)

    # Set icon (next step)
    # set_folder_icon(folder, grid)

if __name__ == "__main__":
    main()
Now when you run the script:
- First time: Creates and saves
cover.png - Second time: Exits with warning message
- With
--force: Overwrites existingcover.png
 Alright! We’ve got a 2 x2 grid to use for the cover. Now to save it as the folder icon.
Saving the image as a folder icon from Python
Earlier we used the fileicon CLI tool to update the folder icon from the terminal. But now we’re building the thumbnail image in a Python script, so it would be better if we could set the folder icon from Python. This can be done using the Python subprocess module to call command line tools from within a script.
import subprocess

def set_folder_icon(folder_path, icon_path):
    """Set the folder icon using fileicon CLI tool."""
    try:
        # Check if fileicon is installed
        result = subprocess.run(['which', 'fileicon'],
                              capture_output=True, text=True)
        if result.returncode != 0:
            print("❌ Error: fileicon not found. Install with: brew install fileicon")
            return False

        # Set the folder icon
        cmd = ['fileicon', 'set', str(folder_path), str(icon_path)]
        result = subprocess.run(cmd, capture_output=True, text=True)

        if result.returncode == 0:
            print(f"✅ Set folder icon for: {folder_path}")
            return True
        else:
            print(f"❌ Error setting folder icon: {result.stderr}")
            return False

    except Exception as e:
        print(f"❌ Error: {e}")
        return False
Putting it all together, here’s the final version of the script:
from pathlib import Path
from PIL import Image, ImageDraw
import sys
import subprocess
import argparse
def get_image_files(folder_path, max_count=4):
"""Get up to max_count image files from the folder."""
supported_formats = {'.jpg', '.jpeg', '.png', '.gif', '.bmp', '.tiff', '.webp'}
image_files = []
for file_path in Path(folder_path).iterdir():
if file_path.is_file() and file_path.suffix.lower() in supported_formats:
image_files.append(file_path)
if len(image_files) >= max_count:
break
return image_files
def create_thumbnail_grid(image_paths, folder_path, output_size=(512, 512), force=False):
"""Create a 2x2 grid from up to 4 images with proper aspect ratio handling."""
# Check if cover.png already exists
cover_path = Path(folder_path) / "cover.png"
if cover_path.exists() and not force:
print(f"⚠️ cover.png already exists in {folder_path}")
print(" Use --force to overwrite")
sys.exit(0)
grid_size = 2
cell_size = output_size[0] // grid_size
padding = 10 # Space between images
# Create blank canvas with dark background
grid_image = Image.new('RGB', output_size, '#212121')
# Calculate positions for 2x2 grid
positions = [
(0, 0), (cell_size, 0),
(0, cell_size), (cell_size, cell_size)
]
for i, img_path in enumerate(image_paths[:4]):
if i >= len(positions):
break
try:
with Image.open(img_path) as img:
# Convert to RGB if needed
if img.mode != 'RGB':
img = img.convert('RGB')
# Calculate size to fit in cell while maintaining aspect ratio
max_size = cell_size - (padding * 2)
img.thumbnail((max_size, max_size), Image.Resampling.LANCZOS)
# Get actual size after thumbnail
thumb_width, thumb_height = img.size
# Calculate position to center image in its cell
cell_x, cell_y = positions[i]
x_offset = (cell_size - thumb_width) // 2
y_offset = (cell_size - thumb_height) // 2
# Paste image centered in its cell
paste_x = cell_x + x_offset
paste_y = cell_y + y_offset
grid_image.paste(img, (paste_x, paste_y))
except Exception as e:
print(f"Error processing {img_path}: {e}")
continue
# Add subtle grid lines
draw = ImageDraw.Draw(grid_image)
# Vertical line
draw.line([(cell_size, 0), (cell_size, output_size[1])], fill=(50, 50, 50), width=1)
# Horizontal line
draw.line([(0, cell_size), (output_size[0], cell_size)], fill=(50, 50, 50), width=1)
# Outer border
draw.rectangle([0, 0, output_size[0] - 1, output_size[1] - 1], outline=(50, 50, 50), width=2)
# Save the grid as cover.png
grid_image.save(cover_path, 'PNG')
print(f"✅ Saved thumbnail grid as: {cover_path}")
return cover_path # Return the path, not the image
def set_folder_icon(folder_path, icon_path):
"""Set the folder icon using fileicon CLI tool."""
try:
# Check if fileicon is installed
result = subprocess.run(['which', 'fileicon'],
capture_output=True, text=True)
if result.returncode != 0:
print("❌ Error: fileicon not found. Install with: brew install fileicon")
return False
# Set the folder icon
cmd = ['fileicon', 'set', str(folder_path), str(icon_path)]
result = subprocess.run(cmd, capture_output=True, text=True)
if result.returncode == 0:
print(f"✅ Set folder icon for: {folder_path}")
return True
else:
print(f"❌ Error setting folder icon: {result.stderr}")
return False
except Exception as e:
print(f"❌ Error: {e}")
return False
def main():
parser = argparse.ArgumentParser(description="Generate folder preview icons")
parser.add_argument("directory", nargs="?", default=".",
help="Directory to process")
parser.add_argument("--force", action="store_true",
help="Overwrite existing cover.png")
args = parser.parse_args()
folder = Path(args.directory).resolve()
# Get images
images = get_image_files(folder)
if not images:
print("No images found!")
return
print(f"Found {len(images)} images")
# Create grid and save as cover.png
cover_path = create_thumbnail_grid(images, folder, force=args.force)
# Set the folder icon
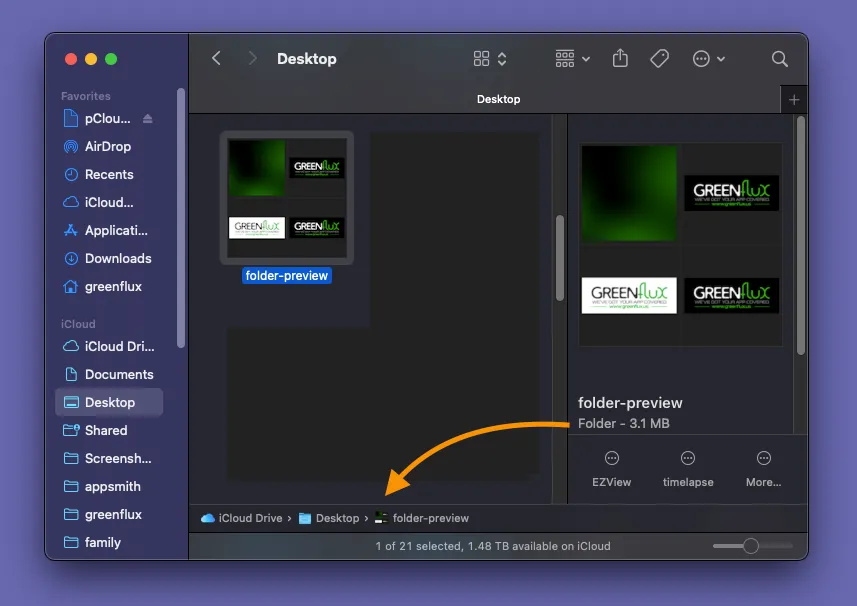
set_folder_icon(folder, cover_path)
if __name__ == "__main__":
main()Save and run it again, and you should see the folder’s icon update!
Adding the script to your PATH so it works in any directory
Right now, you need to be in the script’s directory, or use the full path when calling it. Let’s fix that by making it available system-wide! This way, you can run folder-preview from any directory on your Mac.
Step 1: Add the shebang line
First, we need to tell the system this is a Python script. Add this line at the very top of your folder-preview.py file:
#!/usr/bin/env python3This “shebang” line tells the system to use Python 3 to run this script.
Step 2: Make the script executable
Navigate to your script directory and make it executable:
cd ~/path/to/your/folder-preview
chmod +x folder-preview.py
You can test if it’s executable by running:
./folder-preview.pyStep 3: Create a local bin directory
We’ll install the script to ~/.local/bin, which is a standard location for user scripts. Create it if it doesn’t exist:
mkdir -p ~/.local/binStep 4: Create a symbolic link
Instead of copying the script, we’ll create a symbolic link. This way, any updates you make to the original script are automatically reflected:
# Create the link (run this from your script directory)
ln -s "$(pwd)/folder-preview.py" ~/.local/bin/folder-preview

# Verify the link was created
ls -la ~/.local/bin/folder-preview
Note: We’re naming the link folder-preview (without .py) to make it feel more like a native command.
Step 5: Add ~/.local/bin to your PATH
Now we need to tell your shell where to find the script. The process depends on which shell you’re using.
For zsh (default on macOS Catalina and later):
echo 'export PATH="$HOME/.local/bin:$PATH"' >> ~/.zshrc
source ~/.zshrc
For bash (older macOS versions):
echo 'export PATH="$HOME/.local/bin:$PATH"' >> ~/.bash_profile
source ~/.bash_profile
Not sure which shell you’re using?
echo $SHELL
# Output will be either /bin/zsh or /bin/bash
Step 6: Verify the installation
Test that everything is working:
# Check if the command is found
which folder-preview

# Should output something like:
# /Users/yourusername/.local/bin/folder-preview
Use it anywhere!
Now you can run the script from any directory:
# Go to any image folder
cd ~/Pictures/Vacation
folder-preview

# Or run it on any path
folder-preview ~/Desktop/Screenshots
folder-preview /path/to/any/image/folder
folder-preview . # current directory
Troubleshooting
“Command not found” error?
- Make sure you’ve sourced your shell configuration:
source ~/.zshrc - Verify the symbolic link exists:
ls -la ~/.local/bin/ - Check your PATH:
echo $PATH(should include /Users/yourusername/.local/bin)
“Permission denied” error?
- Make sure the script is executable:
chmod +x ~/path/to/folder-preview.py - Check the symbolic link points to the right place:
ls -la ~/.local/bin/folder-preview
Adding the script to Finder’s Quick Action menu using Apple Scripts
Ok, running it from any directory in the terminal is nice, but ultimate convenience would be to right-click any folder in Finder and instantly generate its preview icon. Let’s create a Quick Action using Automator and AppleScript.
Step 1: Create a new Quick Action
- Open Automator (press
Cmd + Spaceand type “Automator”) - Choose “Quick Action” and click “Choose”
- At the top, set:
- Workflow receives current:
folders - in:
Finder
- Workflow receives current:
Step 2: Add the AppleScript
- Search for “applescript” in the actions library
- Double-click “Run AppleScript” to add it
- Replace the default code with:
applescript
on run {input, parameters}
    repeat with aFolder in input
        set folderPath to POSIX path of aFolder

        -- Get the current user's home directory
        set homeFolder to POSIX path of (path to home folder)
        set pythonScript to homeFolder & ".local/bin/folder-preview"

        -- Check if folder contains images
        set imageCheck to do shell script "find " & quoted form of folderPath & " -maxdepth 1 -type f \\( -iname '*.jpg' -o -iname '*.jpeg' -o -iname '*.png' -o -iname '*.gif' -o -iname '*.bmp' -o -iname '*.tiff' -o -iname '*.webp' \\) | head -1"

        if imageCheck is not "" then
            -- Run the Python script
            try
                do shell script pythonScript & " " & quoted form of folderPath
                display notification "Folder preview created!" with title "Folder Preview"
            on error errMsg
                display notification "Error: " & errMsg with title "Folder Preview"
            end try
        else
            display notification "No images found in folder" with title "Folder Preview"
        end if
    end repeat

    return input
end run
Step 3: Save and use
- Save with
Cmd + S, name it “Generate Folder Preview” - Now right-click any folder with images in Finder
- Go to Quick Actions → Generate Folder Preview
- Watch for the notification - your folder icon is updated!
Optional: Add a keyboard shortcut
- Go to System Preferences → Keyboard → Shortcuts → Services
- Find “Generate Folder Preview” under “Files and Folders”
- Click “Add Shortcut” and set your preferred keys (e.g.,
Cmd + Option + P)
Troubleshooting
Quick Action doesn’t appear?
- Restart Finder:
killall Finderin Terminal - Make sure you saved the workflow
“folder-preview not found” error?
- Ensure you’ve completed the PATH installation steps
- The script should be at
~/.local/bin/folder-preview
That’s it! You now have three ways to generate folder previews:
- Terminal:
folder-preview ~/Pictures - Right-click in Finder → Quick Actions
- Your keyboard shortcut
Conclusion
The Windows style folder preview with image thumbnails can easily be added to MacOS with less than 150 lines of Python, and the fileicon CLI tool from /mklement0. Using PIL (Pillow), a 2 x 2 grid of thumbnails can be automatically generated and set as the folder icon. This script can then be set to run as a quick action in Finder, or assigned to a keyboard shortcut using Apple Scripts.